
First function – counting patterns
Our first function will be a very basic one. It will count repeating patterns, also known as k-mers, in a DNA sequence. This algorithm can be solved in quite a few ways. We are adding it to our genomeToolkit class, right after the __init__ constructor. Let’s take a look at the simplest approach first; the “for loop” approach:
def count_kmer(self, sequence, kmer):
    """Counts repeating k-mers in a sequence. Includes overlapping k-mers"""
    kmer_count = 0
    for position in range(len(sequence) - 1):
         if sequence[position:position + len(kmer)] == kmer:
             kmer_count += 1
    return kmer_count
This is a very basic loop, that uses the length of the sequence, moves by one position through that sequence, and compares kmer to the current position in the sequence. This function accepts three parameters:
self– this is used within a class, and not outside the class. We don’t need to pass anything into it. If you are not sure how it works (yet), feel free to ignore it. We will come back to this in our future videos.sequence– DNA/RNA sequence to search inkmer– subsequence to search for
Our class should look like this:
class genomeToolkit:
def __init__(self):
print("Genome Toolkit initiated")
def count_kmer(self, sequence, kmer):
"""Counts repeating k-mers in a sequence. Includes overlapping k-mers"""
kmer_count = 0
for position in range(len(sequence) - 1):
if sequence[position:position + len(kmer)] == kmer:
kmer_count += 1
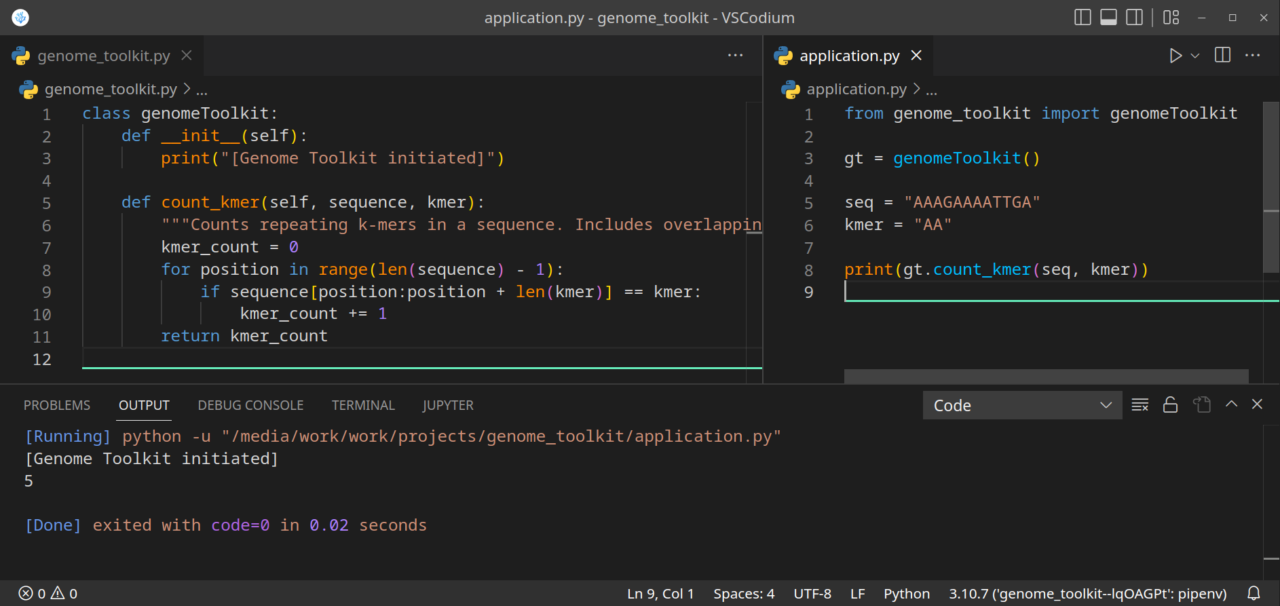
return kmer_countThe best way to make sure it works, is to test it in our application file. In Part 1, we imported our class file and created an instance of that class:
from genome_toolkit import genomeToolkit

gt = genomeToolkit()
Let’s create a test sequence and a test k-mer, and pass them to the instance of our class:
seq = "AAAGAAAATTGA"
kmer = "AA"
And let’s call our function with these parameters, and print it out at the same time:
print(gt.count_kmer(seq, kmer))
If you now save and run this test example, you should see 5 in the output. And you can easily check, that this is correct, by counting how many times AA is present in AAAGAAAATTGA:
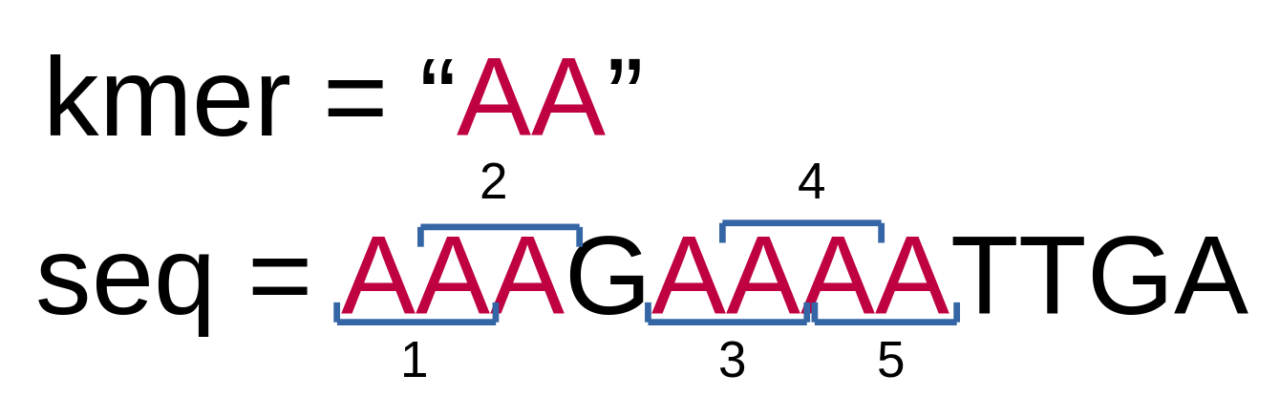
We will try visualizing our algorithms as much as we can. The above example is very simple and easy to understand. More complex algorithms will definitely benefit from such visualizations.
If you use the Python debugger, and look at what is going on the line 9-10 of our function:
if sequence[position:position + len(kmer)] == kmer:
    kmer_count += 1
You will see the same patters as in the visualization above:
if [AA]AGAAAATTGA == AA, Adding 1 to kmer count
if A[AA]GAAAATTGA == AA, Adding 1 to kmer count
if AA[AG]AAAATTGA == AA
if AAA[GA]AAATTGA == AA
if AAAG[AA]AATTGA == AA, Adding 1 to kmer count
if AAAGA[AA]ATTGA == AA, Adding 1 to kmer count
if AAAGAA[AA]TTGA == AA, Adding 1 to kmer count
if AAAGAAA[AT]TGA == AA
if AAAGAAAA[TT]GA == AA
if AAAGAAAAT[TG]A == AA
if AAAGAAAATT[GA] == AA
Here is the final version of our application.py file:
from genome_toolkit import genomeToolkit

gt = genomeToolkit()

seq = "AAAGAAAATTGA"
kmer = "AA"

print(gt.count_kmer(seq, kmer))
This is how our project should currently look like:
This is a very basic, but still useful algorithm for biologists. It can be used as one of the steps in pattern search in genomes. If a genome subsequence (kmer) is known, and biologists have a good understanding what this part of a genome is responsible for (a gene in a plant that is responsible for circadian rhythms, or a gene that codes for eye color, etc.), they can use this algorithm to search for this pattern in genomes of other organisms, and skip slow, manual work of searching for it under the microscope. Biologists can just sequence genomes, and run our code, by specifying what pattern they are looking for. Of course, this is a simple and naive example, as we don’t take into account many other biological concepts, like SNPs (single-nucleotide polymorphism), which will make this particular algorithm useless. That is why this algorithm is just one small piece of our toolkit. Only by combining many algorithms together, we can create something called a “Pipeline”. Pipelines will allow connecting multiple algorithms, each doing its part, to produce the final result. Here is just one example of such a pipeline of 5 steps (each might be its own algorithm):
- Search for a kmer with max hamming distance set to 2 in a sequence A.
- Generate a complementary sequence B, from the sequence A.
- Reverse the sequence B (generate a reverse complement, so we can read from 5′ ⇾ 3′ prime ends).
- Search for a kmer with max hamming distance set to 2 in a sequence B.
- Collect/Display/Graph/Save results.
We will be able to create such a useful pipeline when we add a few more algorithms to our Genome Toolkit.
Even though the “for loop” approach is very simple to write and understand, and it is beginner-friendly, it might not be very fast when we need to search through very long sequences. Image, you have a 500,000 base pair-long sequence, and you are searching not only for a single k-mer, but for a k-mer with up to X mutations (you could use hamming distance for that). This will add up very fast and make our “for loop” approach very slow. There are many other ways of solving this algorithm. We will take a look at one that is both a faster, and shorter, solution in our next video. For now, see if you can figure out a better way of solving this algorithm.
When you are just starting with programming, there is absolutely no need to try solving any problem in the most efficient way. It will probably be impossible anyway. You will learn better ways as you progress. Having a very basic solution, like the “for loop” one, that actually works, is easy to read and understand, is far more important than having a solution that is convoluted, ambiguous, and hard to read. Try solving your algorithm in the most basic and clean way, and try improving it only when you run into performance issues. In this series, this is exactly what we will be doing.
If you want to improve your Python code, and be able to come up with more Pythonic and clean solutions, I recommend reading the “Effective Python: 90 Specific Ways to Write Better Python, Second Edition (UK/US)” book.
This is it for this article.
As always, this article is available in a video from here:

One thought on “Genome Toolkit. Part 2: in search of patterns”