

Welcome back to the Genome Toolkit series!
We have reached the final part of our foundational refactor.
By the end of Part 4.6, the main Genome Toolkit flow already works:
FASTA
  ↓
SequenceRecord
  ↓
DNA
  ↓
algorithm(Sequence)
  ↓
structured result
    ├── metadata
    ├── inputs
    ├── parameters
    └── output
We now have a modern uv project, validated biological models, plain-text and FASTA loading, generic k-mer algorithms, and structured scientific results.
That is a big improvement over the small script we started with.
But before we leave the refactoring work behind and return to adding more bioinformatics, there is one important question left:
What happens when something goes wrong, and how do we make sure the behavior we already built keeps working as Genome Toolkit grows?
That is what Part 4.7 is about.
We are going to add a small set of meaningful Genome Toolkit errors, introduce automated tests with pytest, use those tests to discover a few real edge cases, fix only what the tests show us needs fixing, replace our old README with a practical final version, and then run one last verification of the project.
Our path looks like this:
working architecture
        ↓
clear error types
        ↓
automated tests
        ↓
tests expose hidden problems
        ↓
small focused fixes
        ↓
rerun tests
        ↓
README + documentation
        ↓
final verification
        ↓
PART 4 REFACTOR COMPLETE
The architecture is already doing its job. In this part, we are adding the reliability around it: clear errors, automated checks, and one final verification before we return to bioinformatics.
Before We Start: Two Useful Background Videos
We only need a small part of Python exception handling and pytest for this article, but both topics are important enough that they are worth understanding properly.
If exceptions or automated testing are completely new to you, I strongly recommend making a short detour before continuing. Spend some time learning what exceptions are, what tests do, how a simple test is written, and why developers run those tests again and again while software changes.
These two videos are a good starting point.
Python exceptions
Corey Schafer — Python Tutorial: Using Try/Except Blocks for Error Handling
pytest
Anthony Explains — getting started with pytest (beginner – intermediate)
You do not need to become a testing expert before continuing with us.
We will explain every pytest feature we actually use. The reason for the detour is simply that testing is a normal part of building serious software, and it becomes especially important for scientific software. If somebody uses our toolkit for an experiment, we want them to know that the code was not only written and manually tried a few times, but that important behavior is also checked automatically.
Tests will not prove that every scientific result is biologically correct. We will come back to that distinction later. What they give us is a repeatable way to check the software behavior we have deliberately defined.
What Are We Changing?
Part 4.7 adds one small module to the package:
src/genome_toolkit/exceptions.pyand one new top-level directory:
tests/We will also update:
src/genome_toolkit/load/text.py
src/genome_toolkit/load/fasta.py
src/genome_toolkit/algorithms/kmer.py
README.md
pyproject.toml
uv.lock
Our biological models, structured-result design, and the experiment workflow from Part 4.6 stay in place.
There is one useful design idea to keep in mind.
Genome Toolkit should understand failures that belong to Genome Toolkit itself. For example:
this FASTA file is malformed
this biological record does not exist
this algorithm parameter does not make sense
A future user interface can decide how to present those failures.
That future interface could be:
a Python script
a web application
an API
an AI agent
another scientific tool
Genome Toolkit should simply report the scientific or data-processing problem clearly. We do not need to put web-server logic, AI-agent logic, or user-interface behavior inside the scientific package.
1. Add Clear Genome Toolkit Exception Types
Before we write the tests, let us make one small improvement to the errors Genome Toolkit can report.
Python already gives us useful built-in exceptions such as:
FileNotFoundError
PermissionError
ValueError
Pydantic gives us:
ValidationErrorWe are keeping all of those where they already describe the problem clearly.
The problem is that ValueError can mean many different things. For example:
the caller used a function incorrectly
the FASTA source is malformed
the requested biological record does not exist
an algorithm parameter does not make sense
For a small script, reading the message may be enough.
For a library that may later be used by another Python program, a web API, an MCP tool, or an AI agent, it is useful to distinguish these failures by their Python type as well.
The professional name for what we are adding is custom domain exceptions.
They are normal Python exception classes whose names describe failures that have specific meaning inside Genome Toolkit.
You can also think of them as clearer labels for different kinds of problems:
FormatError
→ the source data has the wrong structure

RecordNotFoundError
→ the source is valid, but the requested record is missing

AlgorithmInputError
→ an algorithm parameter is outside the supported domain
Create:
src/genome_toolkit/exceptions.py # <-- NEWwith:
"""Genome Toolkit domain exceptions."""


class GenomeToolkitError(Exception):
    """Base exception for Genome Toolkit domain errors."""


class FormatError(GenomeToolkitError):
    """Input data does not follow the expected format."""


class RecordNotFoundError(GenomeToolkitError):
    """Requested biological record was not found."""


class AlgorithmInputError(GenomeToolkitError):
    """Algorithm parameter is outside its supported domain."""
These classes deliberately contain no extra machinery.
GenomeToolkitError gives us one common base class. The three subclasses give callers a more specific category when something goes wrong.
We will use this simple rule:
file does not exist
→ FileNotFoundError

permission denied
→ PermissionError

DNA model validation fails
→ Pydantic ValidationError

caller misuses a Python function
→ ValueError where appropriate

source data has the wrong format
→ FormatError

requested biological record does not exist
→ RecordNotFoundError

algorithm parameter is outside the supported domain
→ AlgorithmInputError
That is enough for the scientific package.
A future API, web application, or AI agent can decide how it wants to present those errors to an end user.
2. Add pytest as a Development Dependency
Now let us add the tool that will run our automated tests.
From the Genome Toolkit project root, run:
uv add --dev pytestThe important part is:
--devThat tells uv that pytest is a development dependency.
We need pytest while we are building and checking Genome Toolkit, but somebody using the scientific package does not need pytest just to run its algorithms.
After the command, expect these two files to change:
pyproject.toml    # <-- UPDATED
uv.lock           # <-- UPDATED
This also makes the development environment reproducible.
Having pytest installed inside one existing .venv is not enough. Declaring it in the project means another machine can run:
uv syncand get the testing dependency too.
We can quickly verify that pytest is available:
uv run pytest --versionNow we are ready to write our first automated checks.
3. Start With Two Simple DNA Tests
We will start with the easiest part of Genome Toolkit.
Our DNA model already works, and these tests do not require any implementation changes.
Create:
tests/
└── test_sequence.py    # <-- NEW
3.1 Check That DNA Keeps Its Identifier and Normalizes the Sequence
Start with the import we need:
from genome_toolkit.sequence import DNAThen add:
def test_dna_preserves_identifier_and_normalizes_sequence() -> None:
    """Check that DNA keeps the identifier we provide
    and converts lowercase sequence symbols to uppercase.
    """
    dna = DNA(
        identifier="example",
        sequence="acgtn",
    )

    assert dna.identifier == "example"
    assert dna.sequence == "ACGTN"
This gives us one small permanent check for two pieces of normal DNA behavior:
identifier
→ preserved

sequence
→ normalized to uppercase
Run:
uv run pytest tests/test_sequence.py -vThe -v means verbose. It tells pytest to show the individual test names.
We should see:
test_dna_preserves_identifier_and_normalizes_sequence PASSED3.2 Check That Invalid DNA Still Fails
Now we want to check the opposite case.
This test needs pytest and Pydantic’s ValidationError, so this is the point where we add those imports:
import pytest
from pydantic import ValidationError

from genome_toolkit.sequence import DNA
Add:
def test_dna_rejects_invalid_symbols() -> None:
    """Check that DNA refuses sequence symbols outside
    the alphabet supported by our DNA model.
    """
    with pytest.raises(ValidationError):
        DNA(
            identifier="example",
            sequence="ACGTZ",
        )
pytest.raises(ValidationError) means that this failure is the expected behavior.
If ACGTZ suddenly becomes valid DNA in our model, the test should fail.
Run again:
uv run pytest tests/test_sequence.py -vBoth tests should pass.
We now have a working pytest setup and our first automated checks.
4. Update the Loader Error Types Before Testing the Loaders
Before we write tests for text.py and fasta.py, we want those loaders to use the clearer exception types we just created.
The important point is that we are not rewriting the loaders.
We are changing only the places where an existing generic ValueError has a more useful Genome Toolkit meaning.
This lets us finish each source file once and then stay inside the test file while we verify the behavior.
4.1 Update text.py
Open:
src/genome_toolkit/load/text.pyThis file now needs FormatError, so add:
from genome_toolkit.exceptions import FormatErrorThe plain-text loader already checks whether the file contains usable sequence data.
Change this:
if not sequence:
    raise ValueError(
        f"'{path}' does not contain sequence data."
    )
to this:
if not sequence:
    raise FormatError(
        f"'{path}' does not contain sequence data."
    )
The meaning is now more specific:
file exists
but contains no usable sequence
→ FormatError
A missing path still naturally raises:
FileNotFoundErrorPython already describes that case correctly, so we do not catch or wrap it.
Because this is a public function, make sure its Raises: documentation matches the new behavior:
Raises:
    FormatError: If the file does not contain usable sequence data.
That completes the Part 4.7 change in text.py.
4.2 Update fasta.py
Now open:
src/genome_toolkit/load/fasta.pyThe FASTA loader needs two of our new exception types:
from genome_toolkit.exceptions import (
    FormatError,
    RecordNotFoundError,
)
The rule is:
bad FASTA structure or unusable FASTA data
→ FormatError

valid FASTA, requested record does not exist
→ RecordNotFoundError

caller misused the Python function
→ ValueError
We only need to update the existing failure branches.
_parse_header(): Blank Header
Change:
if not header:
    raise ValueError(
        "A FASTA header must contain a sequence identifier."
    )
to:
if not header:
    raise FormatError(
        "A FASTA header must contain a sequence identifier."
    )
Here header is singular because _parse_header() is checking one FASTA header.
get_headers(): Sequence Before the First Header
Change:
elif not headers:
    raise ValueError(
        f"'{path}' does not begin with a FASTA header."
    )
to:
elif not headers:
    raise FormatError(
        f"'{path}' does not begin with a FASTA header."
)get_headers(): No FASTA Records
Change:
if not headers:
    raise ValueError(
        f"'{path}' does not contain FASTA records."
    )
to:
if not headers:
    raise FormatError(
        f"'{path}' does not contain FASTA records."
    )
Here headers is plural because get_headers() owns the list of discovered records.
get_sequence(): Sequence Before Any Header
Change:
if not seen_header:
    raise ValueError(
        f"'{path}' does not begin with a FASTA header."
    )
to:
if not seen_header:
    raise FormatError(
        f"'{path}' does not begin with a FASTA header."
)get_sequence(): Requested Record Is Missing
Change the existing missing-record error from ValueError to RecordNotFoundError:
if selected_identifier is None:
    target = (
        identifier
        if identifier is not None
        else f"index {index}"
    )

    raise RecordNotFoundError(
        f"No sequence found matching '{target}' in '{path}'."
    )
The FASTA source itself may be perfectly valid here. The requested record simply is not present.
get_sequence(): Selected Record Has No Sequence
Keep the existing check, but report it as a format problem:
if not sequence:
    raise FormatError(
        f"Sequence '{selected_identifier}' in '{path}' "
        "does not contain sequence data."
    )
We still keep ordinary ValueError for direct Python API misuse:
both identifier and index supplied
neither selector supplied
blank identifier
negative index
Finally, make sure the public Raises: documentation agrees with the implementation:
Raises:
    ValueError: If both selectors or neither selector is provided,
        `identifier` is empty, or `index` is negative.
    FormatError: If the FASTA structure is invalid or the selected
        record contains no sequence data.
    RecordNotFoundError: If the requested identifier or index does
        not exist.
That completes the Part 4.7 changes in fasta.py.
We do not need to return to either loader again.
5. Test the Loaders
Now we can stay inside one file:
tests/test_load.pyWe will add the tests one at a time.
The short docstring inside each test explains exactly what behavior we are checking, so we do not need a paragraph of theory around every function.
5.1 Plain-text Loading
Start with:
from pathlib import Path

from genome_toolkit.load import text
Add:
def test_text_loader_reads_wrapped_sequence(
    tmp_path: Path,
) -> None:
    """Check that sequence text spread across multiple lines
    and spaces is joined into one clean sequence.
    """
    path = tmp_path / "sample.txt"

    path.write_text(
        """
         AATT
           TTAA
          AAC
        """,
        encoding="utf-8",
    )

    record = text.get_sequence(path)

    assert record.sequence == "AATTTTAAAAC"
The only new pytest feature here is:
tmp_pathtmp_path is a pytest fixture that gives this test a temporary directory.
We can create realistic little files there without adding disposable test files to the repository.
Run:
uv run pytest tests/test_load.py -vExpected:
test_text_loader_reads_wrapped_sequence PASSED5.2 FASTA Header Discovery
We are using fasta for the first time in this file, so update the import:
from genome_toolkit.load import fasta, textAdd:
def test_fasta_discovers_headers(
    tmp_path: Path,
) -> None:
    """Check that get_headers() finds every FASTA record
    and returns each identifier and description in file order.
    """
    path = tmp_path / "sample.fasta"

    path.write_text(
        """
        >first one
        AAAA
        >second two
        CCCC
        """,
        encoding="utf-8",
    )

    headers = fasta.get_headers(path)

    assert headers == [
        ("first", "one"),
        ("second", "two"),
    ]
Run again:
uv run pytest tests/test_load.py -vBoth tests should pass.
5.3 Select a FASTA Record by Identifier
Add:
def test_fasta_selects_record_by_identifier(
    tmp_path: Path,
) -> None:
    """Check that get_sequence() can find the requested FASTA record
    by identifier and return its identifier, description, and sequence.
    """
    path = tmp_path / "sample.fasta"

    path.write_text(
        """
        >first one
        AAAA
        >second two
        CCCC
        """,
        encoding="utf-8",
    )

    record = fasta.get_sequence(
        path,
        identifier="second",
    )

    assert record.identifier == "second"
    assert record.description == "two"
    assert record.sequence == "CCCC"
Run again:
uv run pytest tests/test_load.py -vExpected: green.
5.4 Select a FASTA Record by Index
Add:
def test_fasta_selects_record_by_index(
    tmp_path: Path,
) -> None:
    """Check that get_sequence() can select a FASTA record
    by its zero-based position in the file.
    """
    path = tmp_path / "sample.fasta"

    path.write_text(
        """
        >first one
        AAAA
        >second two
        CCCC
        """,
        encoding="utf-8",
    )

    record = fasta.get_sequence(
        path,
        index=1,
    )

    assert record.identifier == "second"
    assert record.sequence == "CCCC"
Run again.
Expected: green.
5.5 Test the Loader Error Types
Now this file needs pytest and our two loader exceptions, so add them now:
import pytest

from genome_toolkit.exceptions import (
    FormatError,
    RecordNotFoundError,
)
First, an empty plain-text file:
def test_text_loader_rejects_empty_file(
    tmp_path: Path,
) -> None:
    """Check that an existing text file with no sequence data
    is reported as a Genome Toolkit format problem.
    """
    path = tmp_path / "empty.txt"
    path.write_text("", encoding="utf-8")

    with pytest.raises(FormatError):
        text.get_sequence(path)
Next, malformed FASTA:
def test_fasta_rejects_invalid_format(
    tmp_path: Path,
) -> None:
    """Check that sequence data appearing before the first FASTA header
    is rejected as malformed FASTA input.
    """
    path = tmp_path / "invalid.fasta"

    path.write_text(
        """
        ACGT
        """,
        encoding="utf-8",
    )

    with pytest.raises(FormatError):
        fasta.get_headers(path)
Finally, a valid FASTA file with a missing requested record:
def test_fasta_reports_missing_record(
    tmp_path: Path,
) -> None:
    """Check that valid FASTA raises RecordNotFoundError
    when the requested sequence identifier does not exist.
    """
    path = tmp_path / "sample.fasta"

    path.write_text(
        """
        >first
        AAAA
        """,
        encoding="utf-8",
    )

    with pytest.raises(RecordNotFoundError):
        fasta.get_sequence(
            path,
            identifier="missing",
        )
Run:
uv run pytest tests/test_load.py -vAll loader tests should now be green.
We have checked:
wrapped plain text
→ PASS

FASTA header discovery
→ PASS

FASTA selection by identifier
→ PASS

FASTA selection by index
→ PASS

empty plain text
→ FormatError

malformed FASTA
→ FormatError

missing FASTA record
→ RecordNotFoundError
That finishes the loading layer.
6. Test the K-mer Algorithms
Now let us move to:
tests/test_kmer.pyThere is one important difference from the loaders.
The loaders already had explicit failure branches that we could simply give better exception types.
The k-mer algorithms do not yet have equivalent explicit checks for all of the edge cases we want to test.
If we changed kmer.py first, we would hide the useful part where pytest actually exposes the missing behavior.
So we will stay in the test file, add the reasonable tests, run them, and only then return to kmer.py once.
6.1 Make Sure Overlapping Counting Still Works
Start with:
from genome_toolkit.algorithms import count_kmer
from genome_toolkit.sequence import DNA
Add:
def test_count_kmer_counts_overlaps() -> None:
    """Check that count_kmer() includes overlapping matches
    instead of skipping positions after the first match.
    """
    dna = DNA(
        identifier="overlap",
        sequence="AAAAA",
    )

    result = count_kmer(
        dna,
        "AAA",
    )

    assert result.output.count == 3
For:
AAAAAthe k-mer:
AAAappears three times:
AAA..
.AAA.
..AAA
Run:
uv run pytest tests/test_kmer.py -vExpected:
test_count_kmer_counts_overlaps PASSEDThis is a regression test for behavior that already works.
6.2 Try a Lowercase k-mer
Add:
def test_count_kmer_normalizes_lowercase_kmer() -> None:
    """Check that lowercase input represents the same biological k-mer
    and that the result records the normalized uppercase parameter.
    """
    dna = DNA(
        identifier="example",
        sequence="AAAAA",
    )

    result = count_kmer(
        dna,
        "aaa",
    )

    assert result.output.count == 3
    assert result.parameters.kmer == "AAA"
Do not change the algorithm yet.
6.3 Try an Empty k-mer
This is the first algorithm test that needs pytest and AlgorithmInputError, so add:
import pytest

from genome_toolkit.exceptions import AlgorithmInputError
Then add:
def test_count_kmer_rejects_empty_kmer() -> None:
    """Check that an empty string is rejected because it cannot
    represent a meaningful k-mer for this algorithm.
    """
    dna = DNA(
        identifier="example",
        sequence="ACGT",
    )

    with pytest.raises(AlgorithmInputError):
        count_kmer(
            dna,
            "",
        )
Again, do not change kmer.py yet.
6.4 Check the Normal Most-frequent-k-mer Result
We now use the second algorithm, so update the algorithm import:
from genome_toolkit.algorithms import (
    count_kmer,
    find_most_frequent_kmers,
)
Add:
def test_frequent_kmers_returns_kmers_and_frequency() -> None:
    """Check that the algorithm returns the most frequent k-mer
    together with the number of times it occurs.
    """
    dna = DNA(
        identifier="example",
        sequence="AAATTTAAA",
    )

    result = find_most_frequent_kmers(
        dna,
        k_len=3,
    )

    assert result.output.kmers == ["AAA"]
    assert result.output.frequency == 2
The frequency field already exists from Part 4.6.
This test is only protecting the result we already built.
6.5 Try Invalid k_len Values
For a sequence with length 4, these are useful boundary values:
0
-1
5
Instead of writing three nearly identical test functions, we can use pytest parametrization.
Add:
@pytest.mark.parametrize(
    "k_len",
    [
        0,
        -1,
        5,
    ],
)
def test_frequent_kmers_rejects_invalid_length(
    k_len: int,
) -> None:
    """Check that zero, negative, and too-large k-mer lengths
    are all rejected with the same algorithm input error.
    """
    dna = DNA(
        identifier="example",
        sequence="ACGT",
    )

    with pytest.raises(AlgorithmInputError):
        find_most_frequent_kmers(
            dna,
            k_len,
        )
@pytest.mark.parametrize() tells pytest to run the same test several times with different values.
Conceptually, this one function becomes:
test with k_len = 0
test with k_len = -1
test with k_len = 5
Now run the file:
uv run pytest tests/test_kmer.py -vThe normal behavior stays green, but the new edge cases expose three issue groups:
overlapping count_kmer()
→ PASS

lowercase k-mer
→ FAIL

empty k-mer
→ FAIL

normal find_most_frequent_kmers()
→ PASS

invalid k_len values
→ FAIL
The lowercase case is a real correctness bug.
Our validated sequence is uppercase:
"AAA"but the algorithm compares it directly with:
"aaa"so the strings do not match.
The empty k-mer is different. Python can operate on an empty string, but an empty string is not a meaningful k-mer for this algorithm.
The invalid k_len values are another undefined boundary. We should reject them deliberately instead of relying on strange slicing behavior or a later generic Python error.
Now we know exactly what to change.
7. Fix the K-mer Edge Cases
Open:
src/genome_toolkit/algorithms/kmer.pyThis is the first time the implementation itself needs AlgorithmInputError, so add:
from genome_toolkit.exceptions import AlgorithmInputError7.1 Fix count_kmer()
Before the existing calculation, add:
if not kmer:
    raise AlgorithmInputError(
        "'kmer' must not be empty."
    )

kmer = kmer.upper()
The first check rejects an input that has no meaningful k-mer interpretation.
The second line normalizes the parameter once so both the comparison and the structured result use the same uppercase form.
Update the relevant public docstring lines so the behavior is visible to callers:
Args:
    sequence: Validated biological sequence to search.
    kmer: K-mer to count. The value is normalized to uppercase.

Raises:
    AlgorithmInputError: If `kmer` is empty.
A k-mer longer than the sequence can still naturally return:
0so we do not invent another error for that case.
7.2 Fix find_most_frequent_kmers()
Before the existing frequency calculation, add:
if k_len <= 0:
    raise AlgorithmInputError(
        "'k_len' must be greater than zero."
    )

if k_len > len(sequence):
    raise AlgorithmInputError(
        "'k_len' must not be greater than the sequence length."
    )
These checks define the supported algorithm domain before the calculation starts.
Update its Raises: documentation too:
Raises:
    AlgorithmInputError: If `k_len` is not greater than zero or is
        greater than the sequence length.
We do not add DNA-specific alphabet validation here.
These algorithms accept the shared Sequence model and may later be useful with other biological sequence types.
Now rerun:
uv run pytest tests/test_kmer.py -vEverything in test_kmer.py should be green.
8. Run the Complete Test Suite
While working on one area, a focused command is convenient:
uv run pytest tests/test_kmer.py -vBefore we finish, run everything:
uv run pytest -vThe complete suite checks:
sequence models
loaders
algorithms
expected errors
This gives us one repeatable command we can run whenever Genome Toolkit changes.
Tests do not prove that an algorithm is scientifically correct.
Scientific correctness may still require known reference results, published methods, benchmarking, comparisons with trusted implementations, and biological validation.
What pytest gives us is a repeatable engineering check that the software still behaves the way we deliberately defined.
9. Run the Same Tests From VS Code
Everything we have done so far works directly from the terminal:
uv run pytest -vThat command remains our simplest universal way to run the complete test suite because it works regardless of which editor we use.
If you use VS Code or VSCodium, we can also connect the editor to the same pytest tests. This gives us a visual list of the tests and lets us run the whole suite, one test file, or one individual test without typing the command each time.
This is still the same pytest setup we have already built. VS Code is only giving us a graphical interface around it.
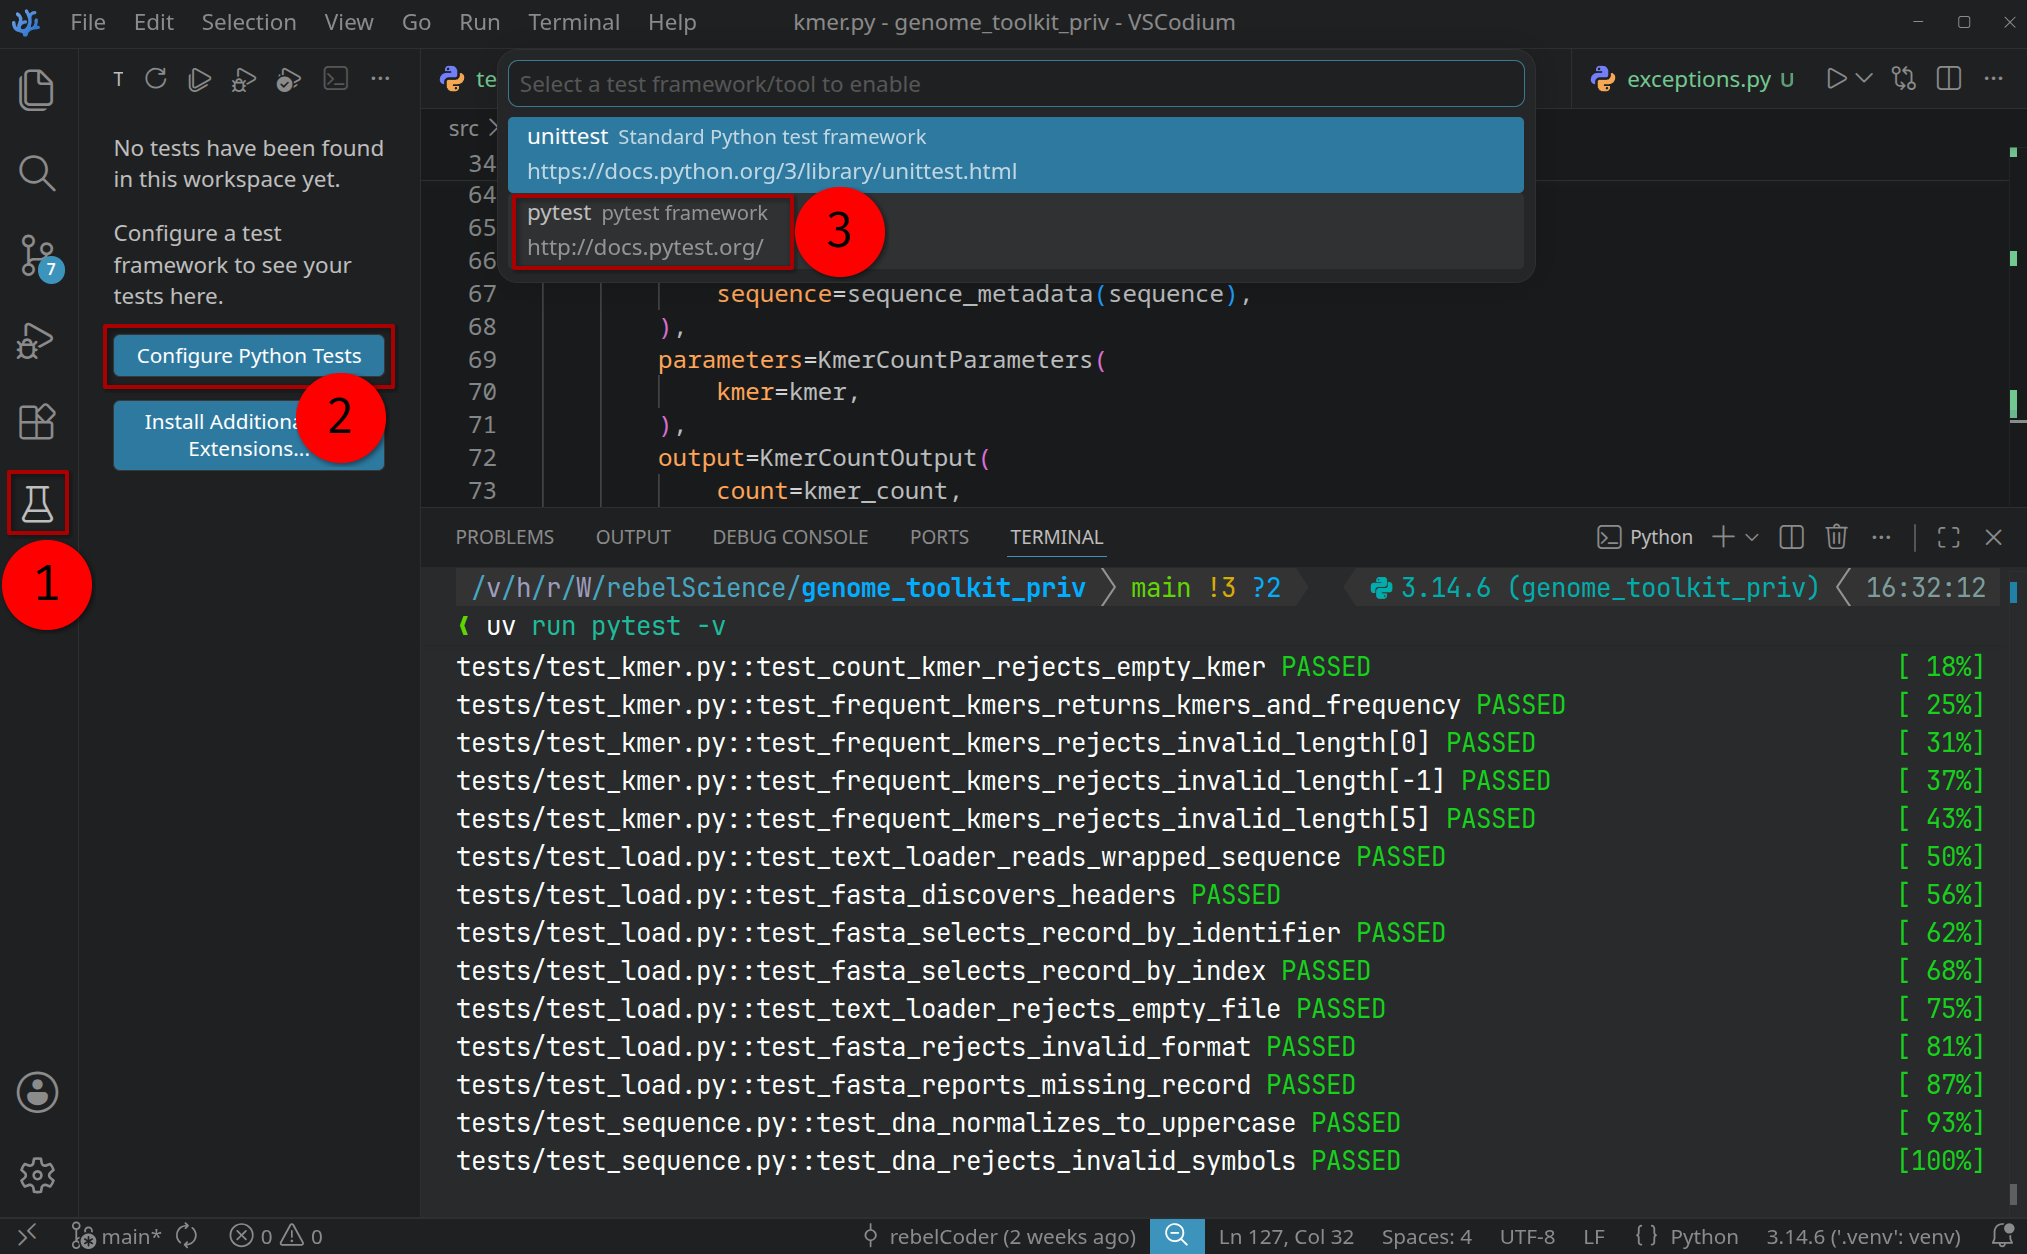
9.1 Configure Python Tests and Choose pytest
Open the Testing panel from the activity bar on the left.
If testing has not been configured for this workspace yet, VS Code will show:
Configure Python TestsClick it and choose:
pytestWe already installed pytest with:
uv add --dev pytestso we are not installing a second testing framework here. We are simply telling VS Code which framework our project already uses.
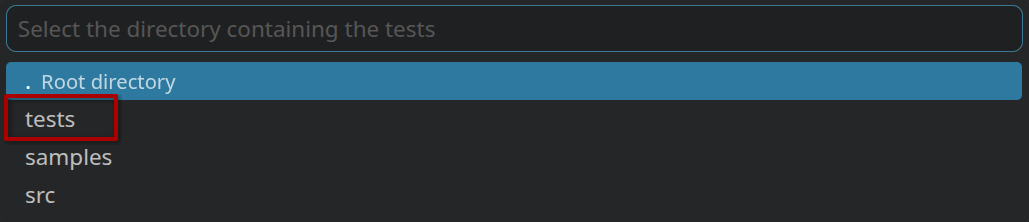
9.2 Tell VS Code Where Our Tests Live
Next, VS Code asks us to select the directory that contains the tests.
Choose:
testsThat is the directory we created in this article:
tests/
├── test_kmer.py
├── test_load.py
└── test_sequence.py
After we select it, VS Code can discover the pytest tests inside those files.
9.3 Run the Complete Test Suite From the Testing Panel
Once discovery finishes, the Testing panel shows our test files and the individual tests inside them.
We can run the complete suite by clicking the Run Test button at the top level of the project.
In our current project, VS Code discovers all of the tests we created in this article. A green check beside a test means its latest run passed.
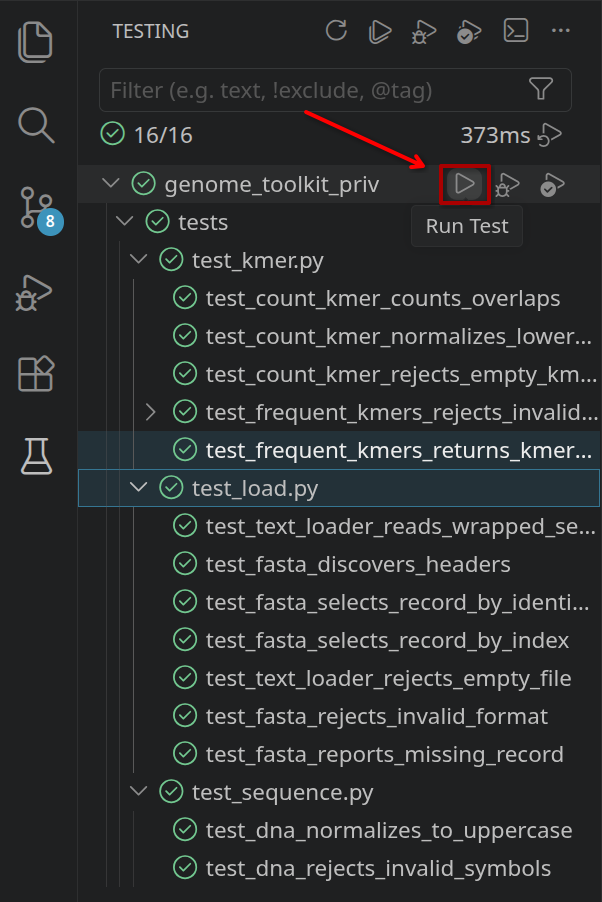
This is the graphical equivalent of running:
uv run pytest -vThe terminal command is still useful and remains the command we can rely on in any editor, CI system, or remote environment.
9.4 Run One Test File or One Individual Test
We do not always need to run everything.
From the Testing panel, we can run:
the complete test suite
one test file
one individual test
We can also work directly inside a test file. VS Code shows a small test-status control beside discovered test functions. After a successful run it appears as a green check, and we can use that control to run that individual test again.
For example, while working on:
test_frequent_kmers_returns_kmers_and_frequency()we can run only that test instead of running all sixteen tests.
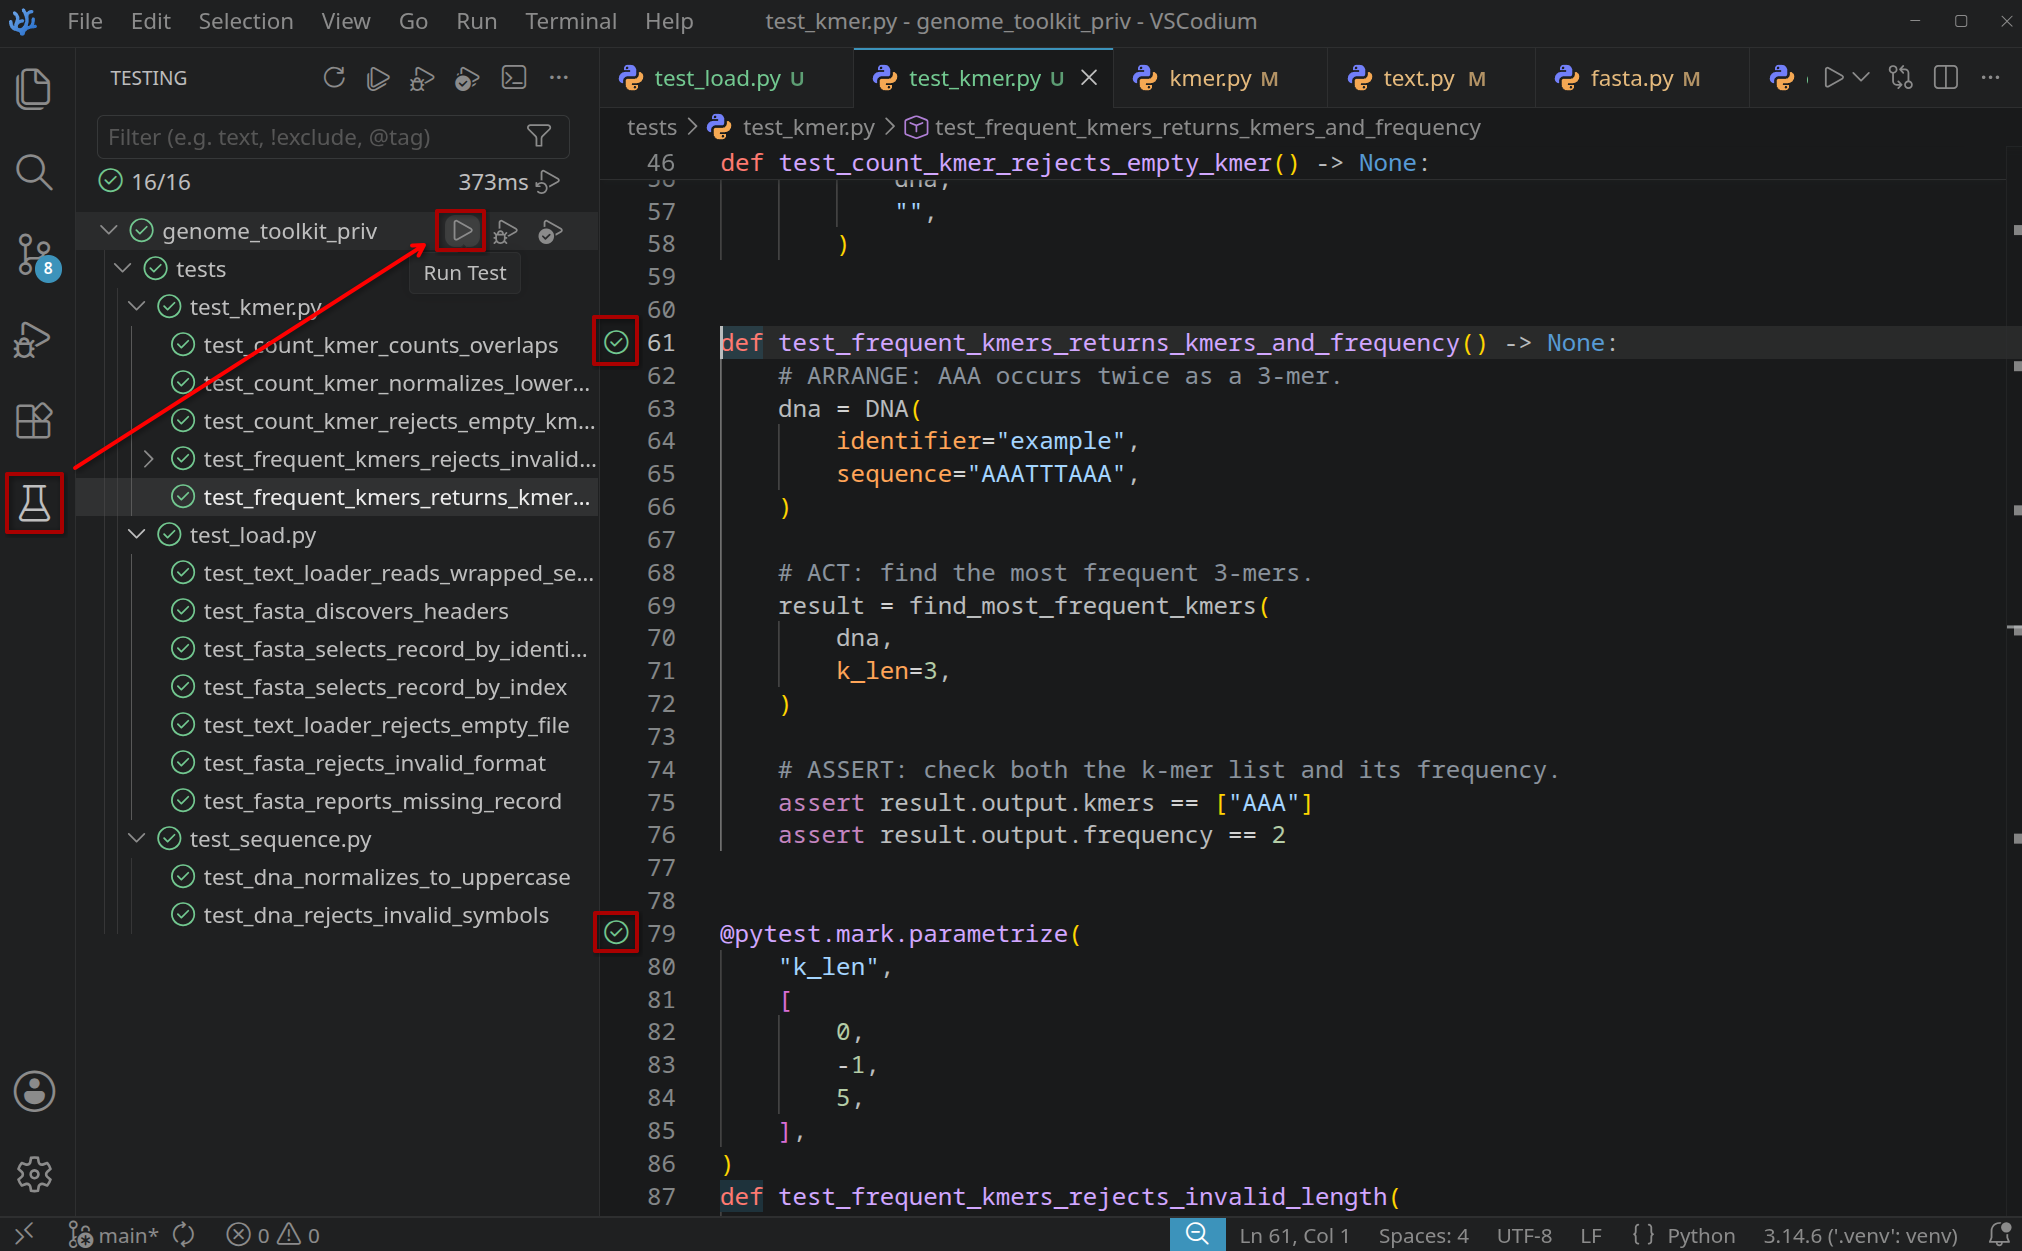
This becomes especially useful as the project grows. While changing one algorithm, we can quickly run its focused test, then run the complete suite before we finish.
9.5 Ignore Local VS Code Settings
Configuring Python tests in VS Code creates workspace-specific editor settings inside:
.vscode/Those settings are useful on our own machine, but they are editor-specific and are not part of Genome Toolkit itself.
Open:
.gitignoreand add .vscode under the local environment section.
Our .gitignore now becomes:
# Python-generated files

__pycache__/
*.py[oc]
build/
dist/
wheels/
*.egg-info

# Virtual environments

.venv
.vscode
This keeps Python-generated files, the local virtual environment, and our local VS Code workspace settings out of the Git repository.
The two ways of running our tests now look like this:
terminal
→ uv run pytest -v

VS Code / VSCodium
→ Testing panel
→ run all tests, one file, or one test
Both use the same pytest tests in the same tests/ directory.
10. Replace README.md With the Final Project README
We have changed Genome Toolkit quite a lot during Part 4.
The README should now describe the project we actually have without turning into another tutorial.
A new reader mainly needs to know:
what Genome Toolkit is
what it can currently do
how to install uv
how to set up the project
how to run the application
how to run the tests
Open:
README.mdand replace its contents with:
# Genome Toolkit

Genome Toolkit is a small Python bioinformatics toolkit for working with DNA sequences and learning how common bioinformatics algorithms work.

## Current capabilities

- Represent and validate DNA sequences
- Load sequences from plain-text files
- Read FASTA files
- Select FASTA sequences by identifier or index
- Count occurrences of a k-mer
- Find the most frequent k-mers in a DNA sequence

## Requirements

The project uses [uv](https://docs.astral.sh/uv/) for Python, dependency, and virtual-environment management.

### Install uv

#### Linux

```bash
curl -LsSf https://astral.sh/uv/install.sh | sh
```

#### macOS

```bash
curl -LsSf https://astral.sh/uv/install.sh | sh
```

#### Windows

```powershell
powershell -ExecutionPolicy ByPass -c "irm https://astral.sh/uv/install.ps1 | iex"
```

Verify the installation:

```bash
uv --version
```

## Installation

Clone the repository:

```bash
git clone https://github.com/rebelC0der/Genome_Toolkit.git
cd Genome_Toolkit
```

Synchronize the environment:

```bash
uv sync
```

`uv` creates and manages the project's virtual environment automatically.

## Running Genome Toolkit

Run the development application:

```bash
uv run application.py
```

Run the complete tests:

```bash
uv run pytest -v
```

## Repository

Genome Toolkit is developed as an educational bioinformatics project focused on simple, readable implementations of biological data handling and algorithms.
The outer example uses four backticks because the README itself contains normal three-backtick code blocks.
We are not adding an examples/ directory in Part 4.7.
application.py remains our development and experiment playground.
11. Final Project Structure
After this final reliability pass, our project looks like this:
Genome_Toolkit/
├── .gitignore                         # <-- UPDATED
├── README.md                         # <-- UPDATED
├── application.py
├── pyproject.toml                    # <-- UPDATED
├── uv.lock                           # <-- UPDATED
├── samples/
│   ├── sample.txt
│   └── sample.fasta
├── tests/                            # <-- NEW
│   ├── test_kmer.py                  # <-- NEW
│   ├── test_load.py                  # <-- NEW
│   └── test_sequence.py              # <-- NEW
└── src/
    └── genome_toolkit/
        ├── __init__.py
        ├── exceptions.py             # <-- NEW
        ├── py.typed
        ├── algorithms/
        │   ├── __init__.py
        │   ├── base.py
        │   └── kmer.py               # <-- UPDATED
        ├── load/
        │   ├── __init__.py
        │   ├── fasta.py              # <-- UPDATED
        │   ├── records.py
        │   └── text.py               # <-- UPDATED
        └── sequence/
            ├── __init__.py
            ├── base.py
            └── dna.py
Every new file now has a clear reason to exist:
exceptions.py
→ clear Genome Toolkit-specific failures

tests/
→ repeatable checks around the package
We have not added extra architecture just to make the project look more complicated.
12. Final Verification
We are ready for one last check.
First, synchronize the environment:
uv syncThen run every test:
uv run pytest -vFinally, run the application again:
uv run application.pyWe can consider the foundational refactor complete when:
package syncs
tests pass
application runs
README explains setup
Why run application.py if we already have tests?
Because they answer slightly different questions.
The tests check specific pieces of behavior automatically.
application.py still gives us a complete real workflow:
FASTA
  ↓
SequenceRecord
  ↓
DNA
  ↓
algorithms
  ↓
structured scientific results
Running both gives us more confidence than relying on only one of them.
Summary
Part 4.7 finishes the reliability and usability work around our Genome Toolkit refactor.
We added four small exception classes:
GenomeToolkitError
FormatError
RecordNotFoundError
AlgorithmInputError
Together they give Genome Toolkit a simple error contract: a predictable way to tell other code what kind of package-level problem happened.
We kept normal Python and Pydantic exceptions where they already made sense.
Then we added pytest and wrote tests for the three main parts of our package:
sequence models
loaders
k-mer algorithms
The interesting part was that testing did not only confirm what already worked.
Our normal cases stayed green:
overlapping count_kmer()
→ PASSED

normal find_most_frequent_kmers()
→ PASSED
But reasonable edge cases found things our manual experiments had missed:
lowercase k-mer
→ FAILED
→ normalize it once

empty k-mer
→ FAILED
→ reject it clearly

invalid k_len
→ FAILED
→ define the valid range
That is exactly the kind of feedback we want from automated tests.
We also connected the same pytest suite to VS Code / VSCodium, added .vscode to .gitignore, replaced the README with a much more useful project landing page, and ran one final project verification.
Genome Toolkit now has:
modern package structure
validated biological objects
FASTA and plain-text loaders
generic k-mer algorithms
structured scientific results
clear Genome Toolkit errors
automated tests
practical setup documentation
The foundation is finished.
New Concepts We Learned
- Exception — The normal Python mechanism for reporting that something went wrong.
- Custom exception — An exception class we create ourselves when a problem has specific meaning inside our own project.
- Domain exception — Another way of saying a custom error that describes a problem from our problem area. For Genome Toolkit, examples include malformed biological data or a missing biological record.
- Error contract — The small, predictable set of exception types our package intentionally uses so other code can understand what kind of failure happened.
- pytest — The testing framework we use to discover and run automated Python tests.
- Development dependency — A package we need while developing or testing Genome Toolkit, but not simply to use its scientific functions.
- Test — Code that runs part of our project and checks whether the result matches what we expect.
- Arrange, Act, Assert — Prepare the input, run the code, and check the result.
pytest.raises()— A pytest tool for checking that code raises the exception we expect.
- Fixture — Something pytest prepares for a test automatically. We used
tmp_pathto get a temporary directory for test files.
- Parametrization — Running one test several times with different input values.
- Regression test — A test for something that already works, kept so a future change does not accidentally break that feature.
- Edge case — An unusual but important input near the limits of what a function is expected to handle.
The main lesson is simple:
Tests do not prove that our biology is correct. They give us repeatable checks that our software behaves the way we have defined, and they help us catch accidental changes before those changes reach a real experiment.
What is Next?
Part 4 is complete.
PART 4
FOUNDATIONAL REFACTOR COMPLETE

        ↓

PART 5+
EXPAND THE SCIENCE
That means our focus can now shift back toward bioinformatics.
Instead of repeatedly restructuring the package, we can use the structure we already built to add more science.
A future algorithm can follow a simple rhythm:
BIOLOGICAL QUESTION

What are we trying to learn or calculate?
Why is it biologically useful?

        ↓

RESULT

What information should the algorithm return?

        ↓

IMPLEMENT

Build the algorithm inside Genome Toolkit.

        ↓

TEST

Test normal inputs.
Try important edge cases.
Check expected failures.

        ↓

EXPERIMENT

Run it on representative or real biological data.
Compare parameters and results.

        ↓

REPEAT
That is the workflow we want to carry into Part 5.
When several algorithms eventually form a genuinely useful workflow, we can keep that workflow in a dedicated example. Until then, application.py remains our place for development and experiments.
As Genome Toolkit grows, we may also open it more broadly so other developers or researchers can contribute algorithms and improvements. And later, the toolkit may be used through other interfaces such as an API or an AI agent.
The important thing is that those future tools can now build on a package whose main features and errors are much clearer and much better tested.
The full source code for Genome Toolkit is available here:
https://github.com/rebelC0der/Genome_Toolkit
I hope adding clear errors, learning how automated tests can expose problems we missed manually, and completing the Genome Toolkit foundation was useful for your bioinformatics and programming journey! If you found this article valuable and want to help us continue building REBELSCIENCE, please consider supporting our project. You can explore various ways to contribute here:
https://rebelscience.club/cryptocurrency-donations/
Until next time, rebelCoder, signing out.
References
- Corey Schafer — Python Tutorial: Using Try/Except Blocks for Error Handling https://youtu.be/NIWwJbo-9_8
- Anthony Explains — getting started with pytest (beginner – intermediate) https://youtu.be/mzlH8lp4ISA
- pytest documentation https://docs.pytest.org/
- pytest parametrization https://docs.pytest.org/en/stable/how-to/parametrize.html
- uv development dependencies https://docs.astral.sh/uv/concepts/projects/dependencies/
- uv installation https://docs.astral.sh/uv/getting-started/installation/
- VS Code Python testing https://code.visualstudio.com/docs/python/testing
Video version: